
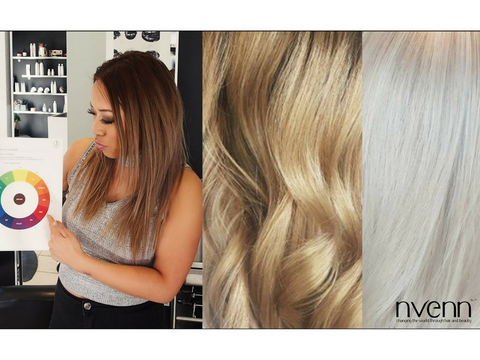
one of our co-founders jessica posted this photo on instagram and got a ton of questions about how to color BLONDE OMBRE with HIGHLIGHTS on top. naturally, we found a lovely lady named clarissa who wanted the style and asked if we could film the process (and teach you a few things along the way).
watch the video, ready the blog, and let us know what you think in the comments :)
so before we dive into the coloring process, let’s take a minute to talk about clarissa’s hair. as you may remember from last week, the LAW of COLOR must be consulted for every coloring job.

clarissa’s ROOTS are at a level 1 or 2, with the rest of the hair being varying shades of BLONDE. we need to address those coloring difference BEFORE we begin lightening the hair.
coloring the ROOTS is the first step for creating our DYNAMIC BLONDE OMBRE. we’ve chosen a warm brunette color from the j beverly hills line.
even though we’re lifting her to a level 6, we’ve found that using a 20 vol instead of 30 or 40 vol helps us avoid HOT ROOTS.
after we’ve applied the ROOT COLOR, we begin to SECTION the hair. we created a horseshoe pattern from the WIDEST POINT of the HEAD before sectioning the top of the head into 4 different triangles. for the lower portion of the head, we simply divided the hair into 3 QUADRANTS.

there are a lot of processes to this, so pay attention!
we’re going to start with the BRUNETTE ACCENTS in the BLONDE OMBRE
before moving on to the LIGHTENER:
in order to create an even flow throughout the hair, we’re WEAVING the hair to avoid solid stripes of color. with the remaining sections, you’ll APPLY LIGHTENER. remember to variate your weaves from section to section. this will help keep a natural flow of color. 

then we’re going to revisit her roots with LIGHTENER. remember to DIFFUSE the line by BACKCOMBING the hair in order to keep your transition natural. otherwise you may end up with a hard line!
once you’ve got your WEAVING work of the brunette color and lightener down, you can LIGHTEN the REST of the HAIR. we MIXED 2 DIFFERENT FORMULAS to make sure that we didn’t damage the ends of clarissa’s hair. one that was strong enough to raise the center sections and another that was gentle enough to not break clarissa’s hair.
after the LIGHTENER has been on for 10 minutes, we checked the FOILS and they’re color matches the ends of the hair.

now we’re ready to WASH the hair out and APPLY TONER. instead of drying the hair entirely, try to leave it a little damp. in some of our previous blogs, we’ve talked about how your hair is like a straw. when it is slightly damp, it absorbs better.
as you can see, there are still a few brassy tones in the hair. but that’s okay! we’re going to tone them out. a lot of people make the mistake of trying to LIGHTEN the hair past these colors, when in all reality it’s much better to tone it out rather than sacrifice the integrity of the hair.

so let’s get to that TONER. we used:
we’re going to start by applying the TONER to the darkest part of the hair before applying it to the top section. we want the TONER to process fully, so we checked it after 20 minutes.

for the last 5 minutes, we’re going to take her to the sink to EMULSIFY the toner before WASHING, DRYING, & STYLING the hair.
now that we’ve got the toner washed out, it’s time STYLE clarissa’s hair. to revitalize her hair, we used nvenn’s REPLENISH restoration oil and massaged it through the hair ROOT to ENDS.
then we used nvenn’s PROTECT to prevent heat damage from the blowdryer.
after we’ve got an even coat of heat protectant, we applied a little bit of nvenn’s FIX to the roots. clarissa LOVES big hair, so applying a bit of our flexible holding hair spray to roots will help add dimension.


the problem is, we can never give the same answer to any of these questions. no 2 coloring jobs are the same! much like our journeys in life, everyone has a different story about how their hair got to the color it currently is.
FOR EXAMPLE: if you’ve spent the last 3 years box dying your hair different shades of red you’re going to need a lot more work than someone who is coming from naturally blonde hair.
whenever you color your hair, you’re depositing pigment. which means the style you want may include your stylist addressing every pigment that’s ended up in your hair over the last few years.
to balance the effects of COLORING & TONING, we consult the LAW of COLOR before choosing HAIR COLOR & TONER.

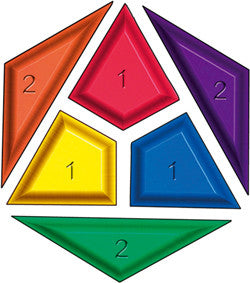
you probably remember the LAW of COLOR from styling school, but it can never be too fresh in your mind. the color wheel should be at the forefront of your mind when you’re mixing formulas, no matter what hair color you’re trying to attain.
there are 3 TYPES of COLORS you need to know about:
a PRIMARY COLOR is any color that cannot be made by mixing any other colors in nature together. the 3 PRIMARY COLORS are RED, BLUE, and YELLOW. there are no 2 colors we can mix together to get red, blue, or yellow.

https://pixabay.com/en/circles-colors-primary-red-blue-27975/
a SECONDARY color is a color that you achieve by mixing two primary colors together. if you mix blue and yellow, you’re going to get GREEN. if you mix yellow and red, you’re getting ORANGE.
https://commons.wikimedia.org/wiki/File:Couleur_secondaire.jpg
a TERTIARY color is a color you get from mixing a primary and secondary color together. mixing yellow and green together is going to give you YELLOW-GREEN. we’ll let you figure out the rest with a color wheel.

https://en.wikipedia.org/wiki/File:RBYcolourwheel.jpg
why are these color laws so important? because they tell us a ton about hair! DARKER HAIR has various different colors as pigments and as you lighten the hair, you’re going to expose these colors. you start with blue that leaves the hair the hair right away when lightening so you will not visually see this. typically you’ll see from red all the way up to the orange, yellow, which is what we know as BLONDE.
it’s important to know the colors you’ll be exposing throughout the process because you’ll need to NEUTRALIZE every pigment you don’t want (or that will prevent you from getting the color you want).
if your client has a lot of orange and brassy tones in her blonde hair, you’re gonna want to tone those brassy colors out with a blue toner. the key to making sure you don’t overdo it and scare your client with blonde hair, make sure you’re mixing accordingly and watching the hair like a hawk!

this applies to clients with LIGHTER HAIR, too. if you’re taking a client 2-3 levels darker than their current color, you’re going to want to fill that color with every pigment in between to avoid ‘muddy’ colors that don’t quite look natural. sure that’s not always possible in the styling world because it takes extra time, but it is well worth it for a beautiful color at the end.

you want to make sure that once you darken 3 levels you add the pigment back to the hair. FILLING the hair will provide a richer color and will last longer.
keep in mind that every dye job is going to require you to look back to the LAW of COLOR. the more you bring this practice to the forefront of your work, the more impressive coloring results you’re going to get from your colors.
let us know if you have any questions in the comments :)


today jessica is taking kim’s hair from a faded brassy brunette to beautiful ASH BLONDE HAIR. since kim hasn’t been in jessica’s chair since november, we’re going to address pre existing color to LIGHTEN the HAIR and balance accordingly for a PERFECT ASH BLONDE HAIR COLOR.
we’re keeping kim’s roots a natural color, so BACKCOMBING and CAREFUL PLACEMENT are going to be our best friends.
watch the video, read the blog, and tell us what you think in the comments :)

the front sections of kim’s hair were already BLONDE, so we’re leaving those two sections out of the equation. from there, we’re going to SECTION the hair according to the PART. this helps us MIRROR the COLOR EQUALLY on both sides of kim’s head without touching her roots, while keeping the color BALANCED on both sides.

start with 1 SECTION at a time. separate the hair HORIZONTALLY and begin BACKCOMBING the HAIR before laying it on the foil. the key to BEAUTIFULLY BLENDED COLOR LINES is BACKCOMBING so don’t forget this step!
now it’s time to LIGHTEN the HAIR. we painted the LIGHTENER on SOFTLY and extended it to the pre existing blonde. we can always lighten the pre existing blonde afterwards, but we don’t want to damage the hair by leaving the lightener on too long.
next we addressed the top of the hair. to create a natural transition, make sure you TURN your BRUSH VERTICALLY and paint on the line. we’re leaving about 3 inches of root, but we aren’t going to be uniform. by alternating from 3 inches to 2 ½ and so on, we’re eliminating the chance of harsh color lines.
#PROTIP: if you’re working with LONG HAIR, it’s a good idea to turn the hair over and make sure that the bleach is evenly saturating the entire piece of hair.
once you’ve finished your first section, you’ll need to repeat the process on all the quadrants of the head and allow it to process for 30 MINUTES. the process time will vary based on the desired result and the strength of the hair.

we mentioned beforehand that kim’s hair was BLONDE at the ends already and that we wanted to avoid having lightener on her ends for a long period of time. as we removed the foils, we painted lightener on the ends of kim’s hair to match the tones.


kim’s ends were still a little darker than the rest of the head. so what we’re going to do is TONE her HAIR to an 8.
we’re going to START on the ends because they’re the darkest and work our way up. you can apply the toner directly to the hair, so don’t worry about another foil process.
#PROTIP: when you’re LIFTING HAIR from BLACK or PREVIOUSLY COLORED HAIR, you want to make sure you toner can process for about 20 minutes and then EMULSIFY it with water to make sure the underpigment is pulled from the hair.

after we washed the toner our and roughly dried kim’s hair, it’s time to make sure we REVITALIZE & PROTECT her hair. to do so, we’re using nvenn’s REPLENISH OIL. simply warm the oil in your hands and MASSAGE it throughout the HAIR.
this lightweight HAIR MOISTURIZER features a luxurious blend of oils, extracts, and vitamins that SOFTEN, TAME FLYAWAYS, and ADD SHINE to the hair—immediately and over time. after applying to damp hair, blow dry to get hair that looks and feels healthy, shiny, smooth, silky, and conditioned.
this hair moisturizer for dry hair helps STRENGTHEN AGAINST BREAKAGE, detangles hair, and dramatically REDUCES FRIZZ. featuring moisture and shine infusers, the clear formula can be used on all types and colors of hair.
now that we’re ready to blowdry kim’s hair, it’s time to put on a layer of nvenn’s HEAT PROTECTANT ‘ PROTECT’.
full of organic sea kelp extract and pure essential oils, this rich elixir quickly REFRESHES HAIR without weighing it down. it provides a PROTECTIVE BARRIER, or heat shield, for preventing heat damage and split ends. use it to PREPARE and PRIME your hair for the best style everyday, and spray it on styled hair to reactivate products already in the hair.
#PROTIP: remember, you need to put on a new layer of HEAT PROTECTANT between EVERY layer of heat.
finally, it’s time to BLOWDRY the HAIR.


now you can see kim’s beautiful ASH BLONDE HAIR is complete.
let us know what you think in the comments & subscribe to our youtube channel to see more videos! <3

this week on our #hairblog, we’re taking our good friend rianna's hair from a flat red to beautiful and vibrant COPPER RED HAIR. rianna came into the salon with a lot of at-home hair jobs that have built on top of her hair. in order to get the RICH COPPER RED OMBRE we’re looking for, jessica will have to address the previous colors.

at the top, we’re going to use a darker RED that melts into a COPPER red before finishing into a STRONG COPPER TONE.
the process is pretty simple:
before we jump into LIGHTENING the hair, we need to prepare it by sectioning the hair into 4 QUADRANTS. make sure to section your hair around your PART.

when it comes to OMBRE, MELTING and BLENDING COLORS, you want to make sure you take where you part your hair into account. this allows your to accurately MIRROR the highlights and and create a NATURAL FLOW for the color.
START in the bottom right quadrant about 2 ½ - 3 inches from the ROOT.
take the first section in your hand and BACKCOMB it. backcombing your hair will make the line very diffused. while you’re lightening, remember to hold your brush VERTICALLY and FEATHER the brush to create the same diffused effect. this prevents the hair from looking dip-dyed.
with each new section, start your BACKCOMB a little further or closer to the root. the variation will create a NATURAL BLENDED LOOK.
REPEAT that pattern to the WIDEST POINT of the head.
to lighten rianna’s hair we’re using:
by staying modest with the lightener we’re able to use a lot of rianna’s original red underpigment to MAINTAIN the COPPER COLOR. if you lighten the hair too far, the copper color will fade much faster. by choosing 7 vol, we’re allowing the copper tone to have a good base to hold onto.
a BABYLIGHT is a fine foil that you take pretty close to the root. when you tone the color later, it breaks the SOLID COLOR and create a more BLENDED OMBRE.
to complete the BABYLIGHTS, weave a fine section of the hair with your comb. the sections should be about this small:

APPLY the lightener a little closer to the root and REPEAT this pattern across the entire section of the head.
once her hair was FULLY FOILED we let the color sit for 18 MINUTES and continued to check the hair in 5-10 MINUTE increments afterwards before WASHING and DRYING the hair.
now that we have her hair LIGHTENED, it’s time to move on to everyone’s favorite part: COLORING.
on rianna’s REGROWTH we applied:
MIDWAY through, jessica learned about the use of another product that left part of rianna’s hair lighter than the rest. in order to ensure a smooth and EVEN COLOR, she mixed another formula:
when we were finished with the DARKER REDS, rianna’s hair looked like:

next, we’re moving on to the COPPER RED TONES in the MIDDLE of the hair. for this section we’re using:
REMEMBER to FEATHER your COLOR to diffuse any harsh lines before applying the final color.

for rianna’s COPPER ENDS, we’re using:
now all that’s left to do is LET THE COLOR DEVELOP and wash it out.
BEFORE we blowdry rianna’s hair, we’re going to PROTECT IT from heat damage and MOISTURIZE with nvenn’s REPLENISH. this lightweight HAIR MOISTURIZER features a luxurious blend of oils, extracts, and vitamins that SOFTEN, TAME FLYAWAYS, and ADD SHINE to the hair—immediately and over time.


we’re also going to mist nvenn’s PROTECT throughout the hair to help add an extra layer of protection from the curling iron. remember, HEAT PROTECTANT is a must when it comes to heated styling tools!
with the hair ready for heat, we dryed and styled rianna's hair to reveal BEAUTIFUL COPPER RED HAIR:


LAVENDER HAIR is the trend we can’t get enough of. no matter where you look, this HAIR TREND stays in style. as a credit to the hair color, this week’s VIDEO & BLOG are all about LAVENDER HAIR COLOR.
to sweeten the deal, this particular hairstyle is a LAVENDER OMBRE.
check out the video, read the blog, and visit our YOUTUBE CHANNEL for the FORMULAS we used to make this style possible :)
as always, you want to start by SECTIONING the hair before applying any color. take your time with this! the key to getting the PERFECT HAIR COLOR is making sure your dye job is NEAT AND CLEAN.

avoid making any type of harsh line and FEATHER the color up the HAIR. if the end of the hair is already very light, avoid putting lightener on the end of the hair. you don’t want to damage the hair any more than you already have by LIGHTNING.

you will need the hair to be a FULL WHITE before the lavender or lilac color will show. so make sure that you’re CHECKING YOUR FOILS and LIGHTENING / TONING FURTHER if you need to.
after you’ve TONED the HAIR to get rid of any unwanted yellow or brassy tones, it should look even, toned, and light enough to hold the exotic color palette :)
in this case, we’re using an INDIGO as a BLENDING tone and the LAVENDER as the CORE tone for the OMBRE HAIR.
BE CAREFUL not to pull a lot of the indigo color down from the top portion of the head. you will want to BLEND a small portion of the color in order to create a flow between the colors, but don’t go crazy! it’s a thin line.
now all you have to do is WASH the COLOR OUT and get ready to style. your hair should look like this during wash out:

you’ve got your lovely LAVENDER HAIR and now you need to know HOW TO TAKE CARE OF YOUR COLOR. when it comes to dying your hair unique and funky colors, hair care if vital to MAKING YOUR COLOR LAST and PROTECTING YOUR HAIR FROM DAMAGE.
let’s talk more about the products we use to keep hair SOFT, SHINY, and HEALTHY.


in addition to the RIGHT PRODUCTS, there are a few more TIPS to KEEPING YOUR COLOR VIBRANT you should keep in mind:
if you’re considering LAVENDER HAIR, keep these tips in mind to keep your color VIBRANT and BEAUTIFUL. in the meantime, tell us what you think in the comments :)

everyone loves the wild and rocker look of 80’s HAIR. however, it’s not always the easiest style to attain when you’ve got straight hair that doesn’t hold to curl well. luckily, anything is possible with the right HAIR PRODUCTS & TECHNIQUE! that’s where jessica comes in. in the video below, she’s going to show you HOW to GET 80s HAIR WITH a WAND.
WHAT YOU’LL NEED:
a WAND is a great styling tool that can help you attain a variety of different CURLS and WAVES. for those of you who haven’t seen one before, they look like this:

source: remington
first, you’re going to PREPARE YOUR HAIR, then you’re going to CURL YOUR HAIR, before LOOSENING the CURLS for BEAUTIFUL WAVES that bring back the 80s!
first things first! plug in the wand to allow it to heat up. in the meantime, take a HEAT PROTECTANT and evenly coat your hair. you’re going to want to make sure that you’re misting it evenly throughout the hair.

it’s a good idea to choose an ALL NATURAL HEAT PROTECTANT like PROTECT. full of ORGANIC SEA KELP, this styling primer PREPARES and PRIMES your hair without weighing it down.
time to get that 80s BIG HAIR started!
the key to WANDING your hair is to create the curls in all different directions. to protect your hand, make sure that you’re pulling the hair out and to the side. don’t forget about your ears! WANDS get much hotter than your average curling iron, so you want to make sure that you when you apply the heat you’re burning the product off and not your actual hair.
start by taking a small to medium section of hair and SEPARATING IT before CLIPPING the REST to the side for now. if you want BIG LOOSER WAVES make sure that you have a medium to large section of hair. for SMALL TIGHTER WAVES, take smaller sections into your hand for more dramatic waves.
generally speaking, you can start CURLING with the WAND wherever you like. however, if you don’t know where you want your part to be- it’s a good idea to leave the top of your head to the end. if you’re anything like us, you like to switch it up! waiting until the end to CURL the CROWN of your head helps you dictate which part looks best today :)

REPEAT this technique for the rest of your hair, adjusting your clip to let down a section at a time. remember, to get a LOOSER CURL, make the sections larger before wrapping your hair around the WAND.
now that we’re done CURLING the hair, we need to CHECK the CURLS to make sure that you’ve:
your CURLS SHOULDN’T BE UNIFORM. after all, the most beautiful quality of 80s HAIR is that it tends to have a mind of it’s own.
now it’s time to pull out the SMOOTHING FLUID.
we recommend NVENN’s SMOOTH. this HAIR SMOOTHER does exactly what it says—and a little more. smooth works to CONTROL CURLS, SLEEK STRAIGHT HAIR, TAME FRIZZ and FLYAWAY HAIR.

at the very least, try to AVOID OILY & GREASY PRODUCTS. not only will they weigh your style down, they simply aren’t healthy for your hair. if you’re seeing a stylist regularly, you’re literally wasting your own investment by using harsh hair products that damage your style.
RUB the SMOOTHING FLUID throughout your hands and begin to run it throughout your curls evenly. LIGHTLY tug and spread the curls to LOOSEN the CURLS you just did.
MAKE SURE you TAKE THE TIME TO APPLY THE FLUID EVENLY! otherwise, you’re going to have FRIZZY HAIR. if your curls aren’t as loose and tousled as you’d like them to be, apply more SMOOTHING FLUID and continue the process.

now that you’ve got your CURLS LOOSE and your HAIR BIG, it’s time to complete the style with FLEXIBLE WORKING HAIRSPRAY. after all, would any 80s INSPIRED HAIRSTYLE be complete without HAIRSPRAY?
for this particular look, FLEXIBLE HAIRSPRAY is the only way to preserve the spirit of the style. we prefer to use non-aerosol hairspray because it’s easier to work with and is typically much softer hair spray.

after another look, there may be areas you want to TOUCH UP. simply REPEAT THE PROCESS WITH LESS HEAT. as we mentioned before, WANDS CAN GET VERY HOT. you do not want to leave your hair wrapped around it for an extended period of time, especially when it’s the second time you’ll have exposed it to heat.
LOCK IN YOUR STYLE with an additional layer of FLEXIBLE WORKING HAIRSPRAY and enjoy the big, bold, and beautiful style of the 80s. if you have any questions or comments, feel free to ask in below :)

if you’ve ever rocked blonde locks, you’ve probably wondered how to get PLATINUM BLONDE HAIR at one point or another. despite the horror stories of LIGHTENING HAIR TO BLONDE you’ve likely heard, it isn’t impossible to go blonde (even after a box dye).
in this case, Jessica’s longtime friend Ally was having that exact problem. after dozens of at-home dye jobs on her hair, Ally wanted PLATINUM BLONDE HAIR.
watch the video, read the blog, and ask any questions you have along the way in the comments :)
naturally as a BLONDE HAIR SPECIALIST (and close friend), i agreed to help her out -BUT- i also made her promise not to touch her hair with any hair dye after it was complete. after all, she was getting into a 9-10 hour HAIR RESTORATION JOB.

Ally had a head of PURPLE, BLONDE, and BLUE hair. with the use of few key products from major producers and our own line, NVENN, i was able to take Ally from PURPLE MESS to PLATINUM BLONDE HAIR! and not just platinum, but a HEALTHY, LUSCIOUS, and SOFT PLATINUM BLONDE HAIR.
and not just platinum, but a HEALTHY, LUSCIOUS, and SOFT PLATINUM BLONDE HAIR.
before we dive into the process, here’s a list of the FORMULAS & PRODUCTS for all our fellow stylists:
TO START, i needed to strip the purple from her hair before applying any bleach or dye. this is where i turn to an amazing product from the J Beverly Hills line called ‘clear’. i mixed ‘clear’ with a bit 2T, so I could begin to REMOVE THE PURPLE PIGMENT from Ally’s hair.
on the top portion of her hair, i put a SHWARZKOPF BLONDEME and a 30 vol on her regrowth areas. i only recommend using 30 vol when the regrowth hair is a level 6 or darker.
STARTING from the PURPLE, i began to paint on everything because of the way the purple pigment has bled into the blonde. normally, you would try your best to not touch the blonde parts but this is a special case. if you’re in a situation where the color has bled, coat the whole head.
Ally’s hair started to LIGHTEN TO BLONDE and turned into mostly a level 10. although the majority of it was blonde, there were still areas that were blue around the tips. that meant it was time to take it to the next step of LIGHTENING to REMOVE the BLONDE TINTS.

to do this i went back to our good friend SHWARZKOPF BLONDEME, but this time we only used a 20 vol. as the BLUE PIGMENT is simply a stain, i didn’t need to use 30 vol.
with this go around, i also used DS LABORATORIES CONTINUUM on Ally’s hair. CONTINUUM repairs the hair, helps keep the cuticles in your hair intact and solidifies strong hair bonds while lightening the hair. that’s an amazing tool, especially when your method to save your friend’s hair is go PLATINUM BLONDE.
this pass was done the same as the first, BOTTOM to TOP.
after i let that sit for about another HALF HOUR, and the second CONTINUUM treatment, it was time to check and see how much blue was left. there was only a small amount of blue left, so i put a nice coating of DEVELOPER on her hair.


now Ally’s hair is basically ready to go. in the video you can still see bits of red from past dye jobs, but that’s ok. to make sure she got amazing colors and tones, we mixed Schwarzkopf 9.5-22 and 10 vol. for Ally’s roots, i used a nice 9P to give her that PEARL PLATINUM BLONDE TONE.
after her hair was all washed out, i broke out the NVENN’S REPLENISH rejuvenating oil.
not only does it help keep your COLOR STRONG it STOPS COLOR from BLEEDING OUT when you wash it.
SECOND, i hit her hair with NVENN’S PROTECT spray to keep her PLATINUM BLONDE HAIR SAFE from any heat damage.
ONCE the HAIR WAS DRY, i sprayed some of NVENN’S FIX on my comb, and followed my comb with the hair dryer all the way up her head. at the end, Ally’s hair was healthy, luscious, soft and beautifully PLATINUM BLONDE.


if you like what you see and want to learn more, comment, like & share @nvennhairbeauty

BUSY SCHEDULE? we can relate. which is exactly why JESSICA LEE is going to show you the 5 MIN MAKEUP & HAIR ROUTINE you’ve always needed to get gorgeous -and- get out the door.
in the video, she’s showing you how to get this look in 10 MINUTES:

altogether, it takes:
if you’re anything like us, you always have a million things to do and about 2 minutes to do them. this look is basic but FABULOUS.
let’s get started.
WHEN YOU WAKE UP, plug in the hair rollers and brush your teeth. after about 5 minutes, you can put your hair into rollers and get started on your makeup.
if you’re looking for powder, think about the amount of coverage that you need. you can buy everything from light coverage to full coverage. consider your skin, if you’ve got acne or skin problems you may want to consider full coverage.
another thing to keep in mind is ALL NATURAL MAKEUP, if you’re an individual who breaks out- you don’t want to put anything with fillers or added chemicals to your skin.
STEP 1:
use your powder as CONCEALER and do a quick layer under your eyes and all over your face and down to the neck.
STEP 2:
once you’re done, choose between BRONZER and BLUSH for contour.
BRUSH it in between your CHEEKBONE and JAWLINE.
STEP 3:
BLEND everything with your POWDER.
STEP 4:
now it’s time to start your eyeliner!
STEP 5:
FILL in YOUR EYEBROWS. when you miss your eyebrows, a full face of makeup looks just a bit… unfinished. make sure you fill in your eyebrows. they are the CURTAINS for your WINDOW SILL. you want to pick a shade for eyebrows that is around the darkest tone in your hair. you can go a little lighter into the medium range, but don’t go darker!
take an angle brush and use the appropriate shade of eyeshadow to your brows. go against the hair to get a nice deposit of color across your eyebrows and tidy the hairs with a little extra pigment.
STEP 6:
it’s time for LASHES! we use FALSE EYELASHES, but you can use mascara if you prefer.
jessica is using DOLLAR EYELASH CLUB lashes. these beautiful keratin protein lashes are quick, easy, and she gets asked all the time: are those lashes fake or not? get yours here :)
#LASHTIP: let the glue get a little tacky so the lashes stick to your eyes easily.
STEP 7:
CHOOSE between LIPSTICK and LIPSTAIN
LIP STAIN is great for all-day wear. certain formulas can dry your lips out, but if you put chapstick on beforehand you shouldn’t experience any cracking.
STEP 8:
finish your eyes by applying MASCARA to the lower lashes.
now all you have to do is TAKE YOUR ROLLERS OUT!
stay tuned to our blog for more MAKEUP ROUTINES and HAIR HACKS. we’re passionate about sharing our knowledge and love for hair, so feel free to ask any questions you may have in the comments :)

let’s talk about SEMI-PERMANENT MAKEUP for a second. it’s awesome. think about it, when you have permenant makeup, you NEVER have to worry about runs, smears, or reapplications. in many ways, it’s this crazy fantasy world where you go to sleep looking your best and wake up the same.
more importantly, semi-permanent makeup provides the longevity (1-2 years) we look for without the lifelong commitment of a permanent cosmetic tattoo. both semi-permanent and permanent cosmetic tattoos will always fade and need touch-ups. as semi-permanent fades- you don’t have to worry about wacky faded coloring or fading lines. you also have the option to change the color, shape, and style as the times change.
although semi-permanent makeup brings you to this fantasy world, the journey there doesn’t come without a process. afterall, it’s a tattoo. IF YOU’VE NEVER HAD A TATTOO, the coloring only hurts the most for the first couple of passes. after that, it becomes pretty numb.
3 ½ HOURS is really all it takes to let your lips go for months of color perfection, and that is exactly what i want to showcase in our new video: TATTOOING MY OWN LIPS.
keep in mind that we use a numbing for your lips, but I wasn’t so lucky. I had to do this myself, so I couldn’t use the numbing lotion. it’s a bit of a challenge not being able to feel where you are going, especially on your face.
DISCLAIMER: I am a trained professional, so DO NOT TRY THIS AT HOME! keep in mind that this process is permanent, and experienced hands are needed. don’t turn into the time you let your little brother do your make up permanently. although you can purchase tattoo guns online, if you don’t know what you are doing, you are most likely going to end up with offset makeup. as you age, that will get worse and worse as you naturally shrink. YIKES!
we’re going to go over a few keynotes from the video, and take a look at what you need to pay attention to when you are getting your cosmetic lip tattoo. during the video i mention COLOR ATTRIBUTES, PASSES, and the HEALING PROCESS.
let’s take a look:
the color you choose isn’t going to turn out how it looks. after the healing process is completed, you will end up with about 30% of the color you choose. the color will transition in color throughout the healing process.
CHOOSE a color with fade and your natural lip tone in mind. this is where HIRING A PROFESSIONAL comes in handy. you may wish to offset a tone in your lips or cancel it out all together. for example, if you want to cancel an orange tone to your lips you would need to use a cooler toned red with a blue/violet base to attain the color you’re looking for.
YOU NORMALLY NEED 2-3 PASSES to SEAL IN THE COLOR. as you start to wipe the color and blood after each pass, you will start to see certain patches where the color didn’t cover. that’s why you might need a second or third pass to guarantee the color takes. it will look like speckles on your lips that don’t have color.
the HEALING PROCESS normally takes at least 10 days, but i got lucky this time and it only took 9 days. hurray for being healthy! we are going to go over what you can expect for each day of healing.
DAY 1: expect your lips to look like they are eating your face for the first 12 hours. they will be big and probably still a bit red from the blood vessels being raised. after the first 12 hours, the swelling will start going down.

DAY 3: the color will start to set in, but so will the scabs. do everything in your power not to scratch them. if you need to get the scabs off, use a tissue and wipe them off.

DAY 4: be prepared for the dryness to set in. my lips basically looked like a chalky film started to show up around them. you can use lip balm, but stay away from lipstick for now.
DAY 5: i woke up looking like someone had wiped a bunch of chalk all over my lips. after using chapstick all day, they started to get hydrated and turn into a rosey color.
DAY 6: after day 6, you are all healed up and ready to go, so you can use lip gloss and other items.
DAY 7: day 7 was simply further healing as the color started to set in.
DAY 8: day 8 my lips were about 98% healed. I had one small patch of dry skin, but that tight and super chapped lip feeling was gone.
DAY 9: by day 9, my lips were fully healed. normally it takes at least 10 days, so i was happy to see them heal faster than normal. by this point the color had fully set in and healed.

permanent makeup is great, and it’s totally worth the healing process. dealing with a little bit of upfront pain and chapped lips for 10 days after is worth the time you get out of tattooing your lips.
if you like the video, or want to share your opinion, leave a comment and subscribe! :)

CURLS, CURLS, CURLS. everybody loves them! which is exactly why you should always have a few HAIR CURLING HACKS up your sleeve. for best results, slightly dirty hair holds its curl much better than freshly washed hair. so try to wash your hair the day before you intend to curl it.
use these 3 SIMPLE WAYS to CURL YOUR HAIR in 10 minutes and rock those voluminous curls no matter how busy your schedule is.

Image Source: Cosmopolitan
BEACH WAVES always bring a bit of summer to your door (even when it’s the middle of winter). these tousled curls can be easily achieved with every girl’s best friend: THE FLAT IRON.

Image Source: LouLou
looking for those BIG, BOLD. and BEAUTIFUL CURLS? with a large barrel curling iron and a hair tie you can have classic curls in a few minutes.

Image Source: Cosmopolitan
for BEAUTIFULLY STRUCTURED GLAM CURLS, you’ll need to use a small to medium barrel curling iron.
everyone has had their share of HAIR CURLING PROBLEMS. whether you’re lacking texture or have heavy, thick hair that seems impossible to manage: it all comes down to 2 factors.
#1 YOUR HAIR CARE ROUTINE
#2 THE PRODUCTS YOU USE IN YOUR HAIR
CURLING YOUR HAIR doesn’t have to take forever. with the RIGHT PRODUCTS by your side, anything is possible. if you have a hard time getting your curls to hold, make sure you aren’t using WEIGHTED products that are adding weight to your hair. more importantly, make sure you’re TAKING CARE OF YOUR HAIR.
at the end of the day, it’s always easier to STYLE HEALTHY HAIR than to style damaged hair.
have any HAIR CURLING HACKS of your own? share them in the comments! don’t forget to stay tuned for video tutorials! they’re coming soon :)

the MILLION DOLLAR QUESTION that EVERY STYLIST hears at least once a day is:
“what HAIRSTYLE will LOOK BEST ON ME?”
the answer isn’t a single style, but more a SET OF GUIDELINES. there are 9 FACE SHAPES that provide guidelines for stylists and clients. generally speaking, certain hairstyles are more fitting on certain FACE SHAPES. in this blog, we’re going to talk about how to FIND YOUR FACE SHAPE and PICK THE BEST HAIRSTYLES for it.
but before we move onto FACE SHAPES, we have to mention the #1 rule about rocking any hairstyle: CONFIDENCE. at the end of the day, confidence can throw any hair rule out the window. sure, there are hairstyles that are more ideal for certain face shapes but if you’re in love with a style… DO YOU!

as we mentioned above, everyone’s face shape tends to fit under 9 face shapes.
people with an OBLONG FACE SHAPE have a face than is slightly longer than it is wide. if you have an oblong face shape, you want to avoid overly lengthy cuts as the length can cause your face to look longer.
considered the IDEAL FACE SHAPE for any length or style of hair. when a person has an OVAL FACE SHAPE, the length of their face is equal to 1 ½ times the width.
the ROUND FACE SHAPE is characterized by a face that is as wide as it is long. ROUND FACE SHAPES don’t mesh well with short and blunt haircuts. LENGTHY styles help to elongate and narrow the face. #PROTIP: go with feathered bangs instead of thick, heavy, or blunt bangs.
when a face shape is RECTANGULAR, the face is longer than it is wide and highlights a prominent jaw and forehead. much like oblong face shapes, RECTANGULAR FACE SHAPES are longer and should avoid excessively long styles to avoid lengthening the face. rock some mid-length cuts!
a SQUARE FACE SHAPE is equally long as it is wide and has a prominent JAW and FOREHEAD. these face shapes shine with long layers and a-line bobs. these strong lines help to SOFTEN STRONG FACIAL FEATURES. try to avoid hair cuts above your jawline.
PROMINENT JAW BONES AND CHEEKBONES define this shape. this face shape FLAUNTS a GRADUATED BOB. known for their body and volume, GRADUATED BOBS are perfect for TRIANGULAR FACE SHAPES. you can also rock shorter layers to add additional volume to your styling process.
defined by a narrow jawline and narrow forehead, with the widest part starting at the cheekbones. lucky for you ladies and gentlemen, this face shape works well with MANY DIFFERENT STYLES. if you’re worried about your forehead and jawline, go with a style that has a lot of body and volume.
INVERTED TRIANGLE FACE SHAPES has a strong forehead, cheekbones, and a narrow jawline. look for styles with that are full around your neck and nape area. this will will in the narrow features of your face and give the appearance of balance. but it’s not a negative! you’re also one of the few face shapes that can rock PIXIE CUTS.
the HEART FACE SHAPE has a wide forehead and cheekbones with a narrow jawline. more often that not, people with this shape will have a WIDOW’S PEAK that helps give their face a HEART appearance. much like inverted triangle face shapes, HEART FACE SHAPES work well with styles that are fuller around the neck and fill in the jawline. PIXIES and SHOULDER LENGTH CUTS will be your best friend.
once you’ve figured out WHAT YOUR FACE SHAPE IS, choosing a style that you’re happy with is MUCH EASIER. try to think about your face shape and the features you’d like to add to (or take away from) when considering hairstyles. for example: if you love your cheekbones, start the layering in your hair at your cheekbones to draw attention to them.
you may also want to take your HAIR GROWTH PATTERNS into consideration before choosing a style. don’t be afraid to ASK A STYLIST for guidance if you’re not sure how your hair grows! they’re AWESOME PEOPLE and are ALWAYS willing to help people feel good about their hair :)


